Minibis
Software and tips to easily build up an automated malware analysis station based on a concept introduced in the paper "Mass Malware Analysis: A Do-It-Yourself Kit".
Author
Christian Wojner
Language
English
License
Password
Due to some special behavior of our software this can sometimes trigger false positives with antivirus products and Google Safebrowsing. For that reason we deliver the according ZIP archive set with a special password.
Password = "CERT.at"
Stay Informed
If you are interested in the actual state and the progress of upcoming features you might want to take a look at Minibis' Twitter channel: https://twitter.com/CERTat_Minibis.
Feedback
If you encounter any issues (that also includes this textfile) even if it's just some kind of misunderstanding we'd be glad if you contact us via wojner(at)cert.at.
Important News
We have been recently informed that some of Minibis' tools are generically detected as potentially bad software by some antivirus-solutions.
After a detailed analysis of the according executables in our lab we can assure you that these detections are just false positives.
Furthermore it's not so unlikely that specific tools focused on dealing with malicious code have some similarity with the latter and are sometimes interpreted as (potentially) malicious by generic detection-methods.
Compatibility Issues
Version 2.1 is not compatible to data of older versions (<=2.0) of Minibis!
Specific Terms
Researcher
According to the classical host/guest-concept of desktop-virtualization this is the host, and furthermore the so to say "save" place in Minibis.
Proband
According to the classical host/guest-concept of desktop-virtualization this is the guest, and furthermore the so to say "dirty" place in Minibis.
Changed Defaults
Keep in Mind! It might be possible that a new Minibis version comes up with (slightly) changed defaults for the scripts. Create a new configuration-file from the in "minibis-gui" integrated/stored default-configuration and compare it with the settings of your existing configurations. Adjust them if necessary.
Read the Readme
Any new version of Minibis comes along with a readme-file which has very detailed information regarding the changes that have been made.
Furthermore the older readmes are also provided as historical information.
Table of Contents
- Background
- Installation Guide
- Configuration Guide
- One Loop-Cycle
- Scripting of Common Tools and Tasks
- Screenshots
Background
For detailed information on the underlying concept we recommend you read our paper "Mass Malware Analysis: A Do-It-Yourself Kit".
Installation Guide
As a Minibis installations includes commercial software it is not possible for us to provide a complete installation-package. The following step-by-step guide will lead you through the configuration of a typical Minibis environment.
- Select the (physical) machine you like to be the home of your Minibis environment.
- Install the latest version of Ubuntu (32 bit) on it.
- Install proftpd (via "apt-get install proftpd" and choose servermode).
- If not already installed install zip (via "apt-get install zip").
- Create a user "minibis" and do not forget to give it a password.
- Give your own user (the one you will start "minibis-cpr" from) full permissions to the home of "minibis" and verify that you can read, write, and delete in it (i.e. by adding your user to the group "minibis" and add writing-permission on /home/minibis to the latter).
- Download Minibis and extract the content of the folder "Researcher" to your desired folder.
- Install Oracle's VirtualBox (follow the instructions on their website).
- Create a new virtual machine (VM) in it using Windows XP as operating-system with a (due to issues with VBox) bridged network-interface. The default settings for the machine and the OS are fine. Disable any autoupdate features, though, as they will add noise to the monitoring-log. Furthermore disconnect any (virtual) volumes (i.e.: CD, ISO, ...) as this is necessary to prevent eventual popups like autoplay, new hardware found etc.).
- Install Acrobat Reader and Flash Player (for the according sample-types to be usable).
- (Optional) Install further tools you'd like to use.
- Transfer "minibis-cpp.exe" to the VM's Windows desktop (eventually by downloading it from our website).
- Execute "minibis-cpp.exe" in the VM and answer an eventual firewall question to NOT BLOCK this application.
- On the upcoming form configure FTP-server, -user, and -password.
- Click "Setup Proband" and make sure that all lines are green. If not install the regarding tool by double-clicking the according line following the instructions.
- Get back to the form with the FTP-configuration and hit "Check Proband's config". This checks if everything's running smoothly.
- Finally - in case of the check was OK - hit "Prepare Proband ..."
- Create a VM-snapshot of this state.
- Close the VM, using the option to revert to the last taken snapshot.
- Bring your samples into Linux's filesystem (i.e. by mounting a CD-Rom).
- Set "minibis-cpr", "minibis-gui", "postminibis", "certatpmp", and "certat.pmp" as executable (chmod +x ...).
Minibis should now be ready for configuration.
Configuration Guide
Note #1! Do never alter an configuration-file directly in an editor, use Minibis for that by clicking on the "Config"-button in the main-window.
Note #2! Use (read) the tooltips Minibis provides for nearly any form-field.
Configuration files
Minibis is (now) based on configuration-files. They are so to say project-files similar to other softwares GUIs which you can open, save, save as, and so on via the according "File"-menu. Any configuration-file should stand for a specific configuration-scenario.
".."-buttons behind fields
As usual a click on such a button brings up a tiny wizard that provides support in finding the proper value.
The "check"-button
By clicking this button the actual configuration is going to be checked for consistency. Note that in case of multiple errors each click will always come up with just one error. So make sure to re-check if you solved a problem.
Samples
... regardless if just one or a whole directory (including its subdirectories) are selected on the main-form.
Scripting
When it comes to scripting we're just talking about Bash-scripts on the Linux side and Batch-scripts on the Windows side. Any of these scripts support replacement-tokens which can be used to include specifics of the actual focused sample. Read the tooltips for further information.
Tip: You can click on the "eye"-button to see an example representation of the regarding script with all replacement-tokens substituted. This is a very convenient way to proof your scripts. Furthermore this will also provide you with some extra-information (i.e. the filesystem-location where the script will run).
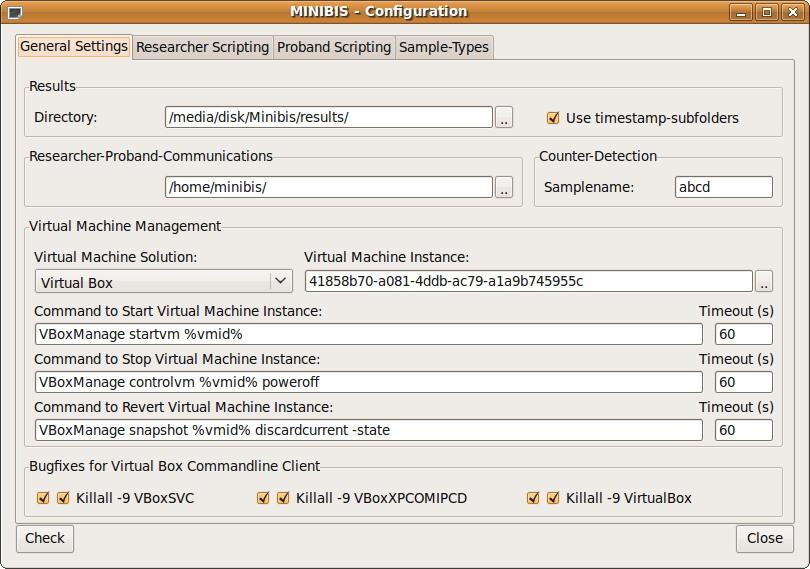
Tab "General Settings"
Area "Results"
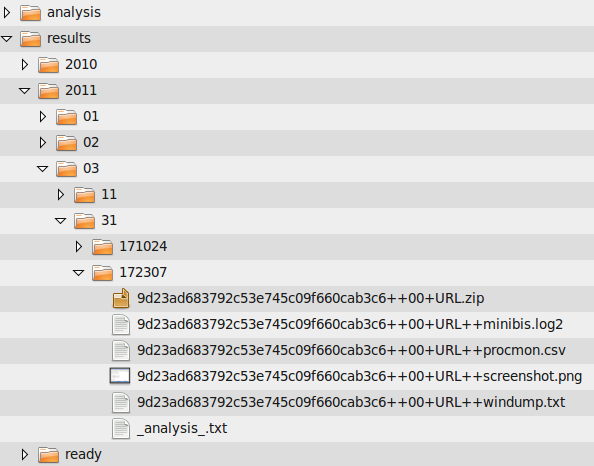
"Directory" is the path where the log-files will be stored. With the checkbox to the right you can choose if all log-files will be stored directly in this directory or if you want to store these in a more organized way by automatically creating subfolders according to the timestamp the regarding scan started.
Area "Researcher-Proband-Communications"
"FTP-Directory" is the path where the log-files will be transferred to from Proband. "Samplename" is the name that will be used for the sample at the proband. Some malware reacts to specific names, so this is the place where you can change it. Regarding "Virtual Machine" you can switch between the actually supported solutions (currently only VirtualBox) and choose the right virtual machine instance.
Area "Bugfixes for Virtual Box Commandline Client"
These are settings that help to prevent processes of VirtualBox from getting stuck. If you already have other (VBox) virtual machines running you might want to uncheck those. The first checkbox addresses stopping and the second reverting the VM.
Area "Virtual Machine Management"
Here you can specify the commands that will be used for the corresponding VM activities. The id of the VM is addressed by the replacement token %vmid%. Besides that, any of them has a timeout for hangup-prevention.
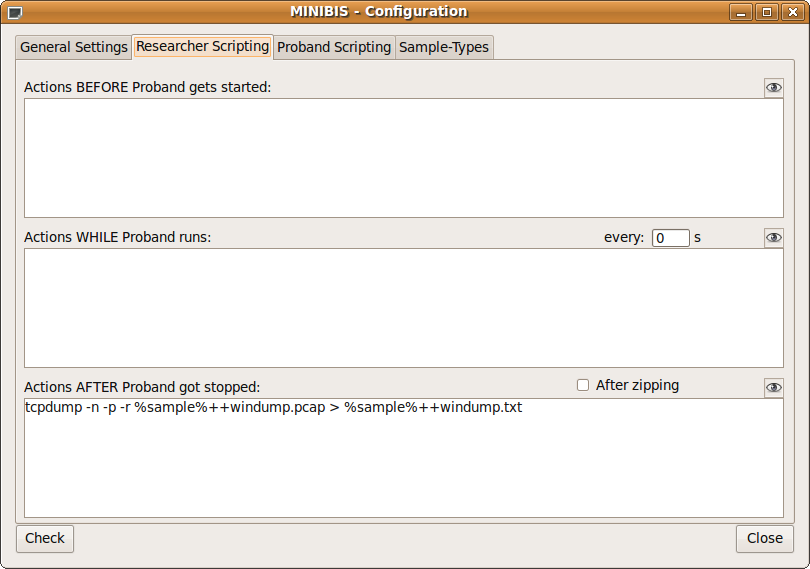
Tab "Researcher Scripting"
To let you customize the researcher side there are three events (therefore three editor-fields) that can be scripted using shell-scripting (Linux). Replacement tokens can be used to include specifics of the actual sample.
For further details when those events exactly happen, see "One Loop-Cycle".
You'll find tutorials and examples regarding scripting under "Scripting of Common Tools and Tasks".
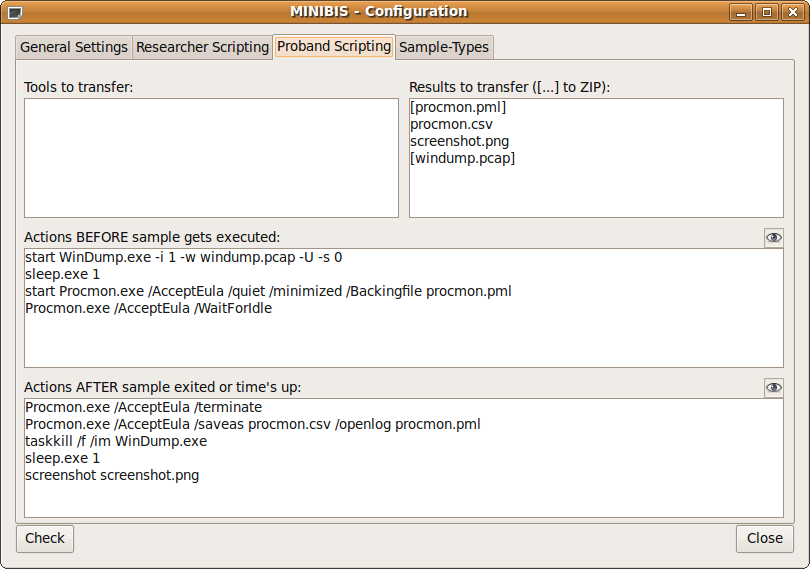
Tab "Proband Scripting"
To let you customize the Proband's side there are two events (the two lower editor-fields) that can be scripted using batch-scripting (Windows).
The actions scripted for these two events are tied to the two editor-fields above called "Tools to transfer" and "Results to transfer ([...] to ZIP)". The first ("Tools...") is used to define (name) the tools (files) that will be copied to the Proband for use in later activities. The second ("Results...") is used to define (name) the files that will be transferred back from the Proband. If the filename is enclosed in square brackets "[...]" the file will get ZIPped into an archive after it arrives on Researcher.
Note: Since version 2.1 we recommend you to have the used tools already at the Proband in its temp-folder. You can still use the tool-transfer-box but especially in situations of mass-malware-analysis it's highly recommended to save time where you can. Furthermore having all those tools in the "right" place will lead to a more cleaned up Minibis environment.
For further details when scripting-events exactly happen and how the "Tools..." and the "Results..." are handled see "One Loop-Cycle".
More Tutorials and examples regarding scripting can be found under "Scripting of Common Tools and Tasks".
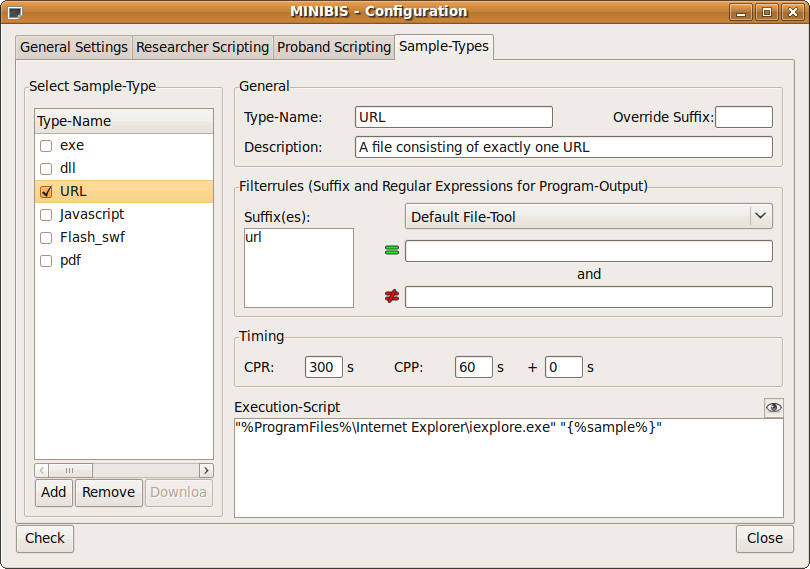
Tab "Sample-Types"
As the execution of samples itself is (now) designed in a generic way any type of sample can be thrown into Minibis as long as it's scripted right. To do so we tried to keep this act as easy as possible. However, don't be scared about the complexity of this feature, in most cases you won't have to do any adjustments to this as Minibis by default is already bundled with scripts for a lot of wellknown sample-types.
Actually Minibis can work with the following sample-types:
- .exe (Windows standard executable filetype)
- .dll (Windows DLLs)
- .swf (Flash movies)
- .pdf (PDFs)
- .js (Javascript code)
- URLs (Websites, etc.)
More sample-types are about to come in the future as necessary or as asked.
Besides that it's necessary to mention that for each sample any activated (by checkmark) sample-type is checked against it if it matches to start a scan according to this type of sample. Furthermore, if you have more than one sample-type that matches the actual sample you'll get one scan-run for each match. The idea behind this is to be able to create multiple sample-type-configurations for example URLs to throw them into various browsers and compare the results afterwards.
All information you need to distinguish between such cases is right in the names of the returned results. Here's the convention:
md5_of_the_sample++internal_vmid+sample_type++resultfile
Example:
b09c357a419069ccd70342419641f812++00+URL++minibis.log2
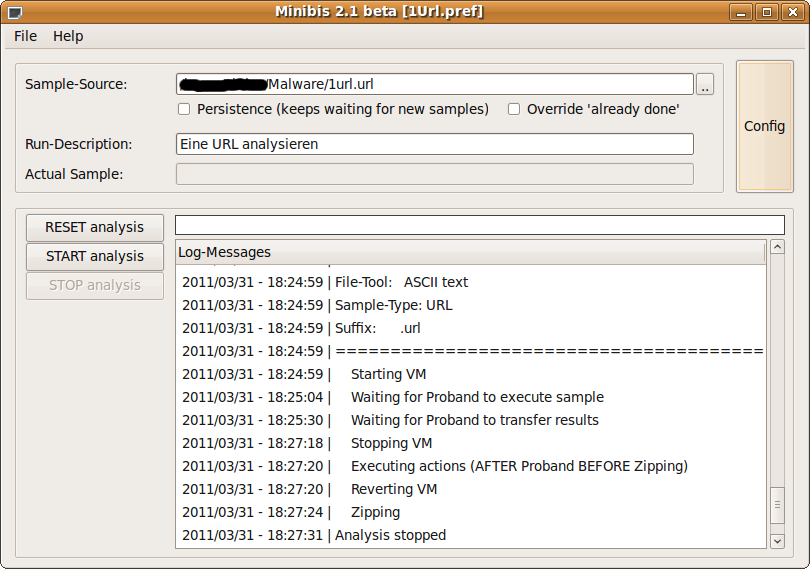
One Loop-Cycle
Assuming that the sample can be executed, this is a chronological list of all actions that can (some of them are optional) happen. It is important to understand that in this list the two components of Minibis - CPR and CPP - are described as what they really are: one logical entity. The tags (R) and (P) specify the location ((R)esearcher or (P)roband) of the action:
- (R) Copy sample to FTP-path (config) as samplename (config) with the apropriate suffix according to the result of Linux' "file"-command.
- (R) Execute the actions tied to event "Actions BEFORE Proband gets started" (config).
- (R) Execute the command declared under "VM Management Start" (config) and wait until the triggerfile "%md5%_start.rdy" exists or the timeout for "VM Management Start" occurs. In case of the latter do the steps 14, 15, 17, 19 and return to step 3.
- (P) Fetch the preference file "minibis.pref" via FTP.
- (P) Fetch all tools (files) according to "Tools to transfer" (config) via FTP.
- (P) Transfer back the triggerfile "%md5%_start.rdy" via FTP.
- (R) Wait until a triggerfile "%md5%_ready.rdy" exists or the timeout for "CPR" (config) occurs.
Meanwhile (optionally) execute the actions tied to event "Actions WHILE Proband runs" and optionally repeat this every N seconds (see config field "every").
If the timeout occurred then continue with step 14. - (P) Execute the actions tied to event "Actions BEFORE sample gets executed" (config).
- (P) Execute the actions tied to "Execution-Script" and wait until it exits or the timeout for "CPP" (config) occurs. If the sample exited wait until the additional timeout ("+") occurs.
- (P) Execute the actions tied to event "Actions AFTER sample exited or time's up" (config).
- (P) Transfer back all files according to "Results to transfer ([...] to ZIP)" (config) via FTP.
- (P) Transfer back the triggerfile "%md5%_ready.rdy" via FTP.
- (P) Exit.
- (R) Execute the command declared under "VM Management Stop" (config) and wait until it exits or the timeout for "VM Management Stop" occurs.
- (R) Optionally execute "Solutions for VBox bugs" column 1 (config).
- (R) Execute the actions tied to event "Actions AFTER Proband got stopped" (config).
- (R) Execute the command declared under "VM Management Revert" (config) and wait until it exits or the timeout for "VM Management Revert" occurs.
- (R) ZIP all files surrounded with [...] according to "Results to transfer ([...] to ZIP)" (config) into the archive "%md5%.zip".
- (R) Optionally execute "Solutions for VBox bugs" column 2 (config).
- (R) Delete "minibis.pref" and the sample from FTP-folder.
- (R) Copy all results from FTP-folder to results-folder.
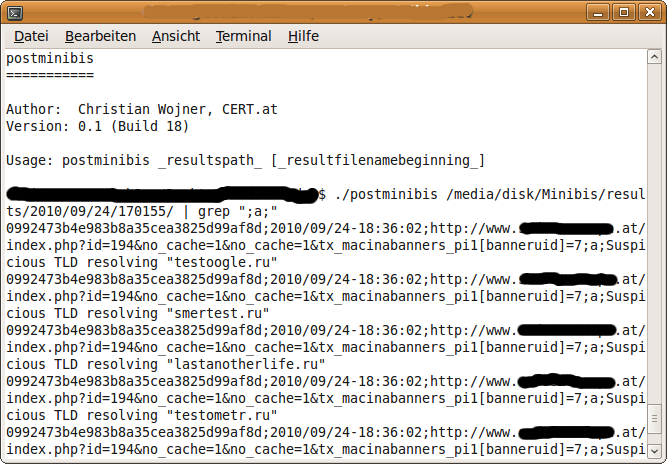
Scripting of Common Tools and Tasks
This section gives you example configurations for the integration of widely used monitoring tools into Minibis.
Sysinternals Process Monitor
You can download/install the latest version of Procmon via "minibis-cpp.exe" by entering its setup (by clicking the according button) and doubleclicking on the regarding line (follow the instructions).
Extract "Procmon.exe" to the temp-folder.
- Proband Scripting
- Results to transfer ([...] to ZIP):
[procmon.pml]
procmon.csv - Actions BEFORE sample gets executed:
start Procmon.exe /AcceptEula /quiet /minimized /Backingfile procmon.pml
Procmon.exe /AcceptEula /WaitForIdle - Actions AFTER sample exited or time's up:
Procmon.exe /AcceptEula /terminate
Procmon.exe /AcceptEula /saveas procmon.csv /openlog procmon.pml
WinDump: tcpdump for Windows
You can download/install the latest versions of WinDump and WinPcap via "minibis-cpp.exe" by entering its setup (by clicking the according button) and doubleclicking on the regarding line (follow the instructions).
Install WinPcap and copy "WinDump.exe" to the temp-folder.
- Proband Scripting
- Results to transfer ([...] to ZIP):
[windump.pcap] - Actions BEFORE sample gets executed:
start WinDump.exe -i 1 -w windump.pcap -U -s 0
sleep.exe 1 - Actions AFTER sample exited or time's up:
taskkill /f /im WinDump.exe
sleep.exe 1 - Actions AFTER Proband got stopped:
tcpdump -n -p -r - < %sample%++windump.pcap > %sample%++windump.txt
Uncheck "After zipping"!
Creating a Screenshot
- Proband Scripting
- Results to transfer ([...] to ZIP):
screenshot.png - Actions AFTER sample exited or time's up:
screenshot.exe screenshot.png
Screenshots